The following sections are included in these instructions:
1. Signing Up (complete)
2. Selecting Modules / Tiers
3. Enrolling Participants
<![if !supportLists]>
1
<![endif]>SIGNING UP
<![if !supportLists]>
1.1
<![endif]>Registering for access
All staff who require
access to the CliRes data system must register for a unique username and
password. There are 3 types of
access requests:
<![if !supportLists]>
·
<![endif]>
Registering a username for a new site which does not already have a site
number (see 1.2)
<![if !supportLists]>
·
<![endif]>
Registering as a new user for an existing site which already has a site
number (see 1.4)
<![if !supportLists]>
·
<![endif]>
Registering as a new user for an existing site which already has a site
number, but you would like to have an additional site number for the same site
(this is not optimal, but accepted if, for example, different wards want to have
separate site numbers) (see 1.5)
<![if !supportLists]>
1.2
<![endif]>Registering a username for a new site that
does not already have a site number
All new sites must
register
on the SPRINT-SARI, CliRes EDC
system. The first person to register a new site will be assigned as the Site
Owner. This person will have the
responsibility to approve all additional users for this site. When another person registers for
database access under the same site, an email will be sent to the Site Owner for
approval (see 1.3 & 1.4). Therefore,
the person who will be responsible for access to site data entry is the person
who should register first.
To register, the person who will be the Site Owner should:
<![if !supportLists]>
·
<![endif]>
Enter the following web address
www.CliResdms.org

<![if !supportLists]>
·
<![endif]>
Select ‘Join’ from the top menu.
<![if !supportLists]>
·
<![endif]>
Select
<![if !supportLists]>
·
<![endif]>
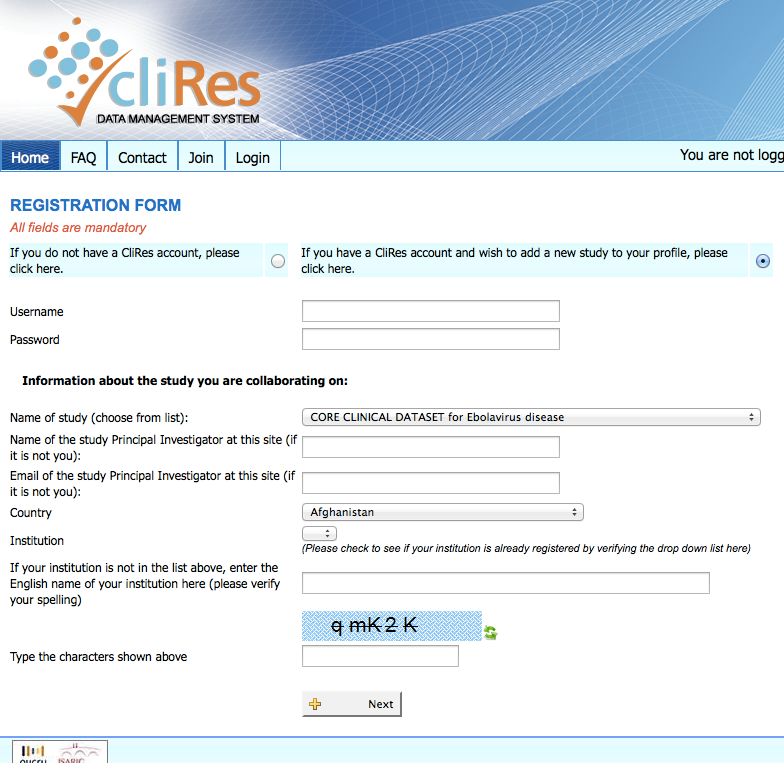
Complete all fields.
<![if !supportLists]>
·
<![endif]>
Select ‘Next’ (at the bottom of the page).
<![if !supportLists]>
·
<![endif]>
A webpage with the following message will be displayed:
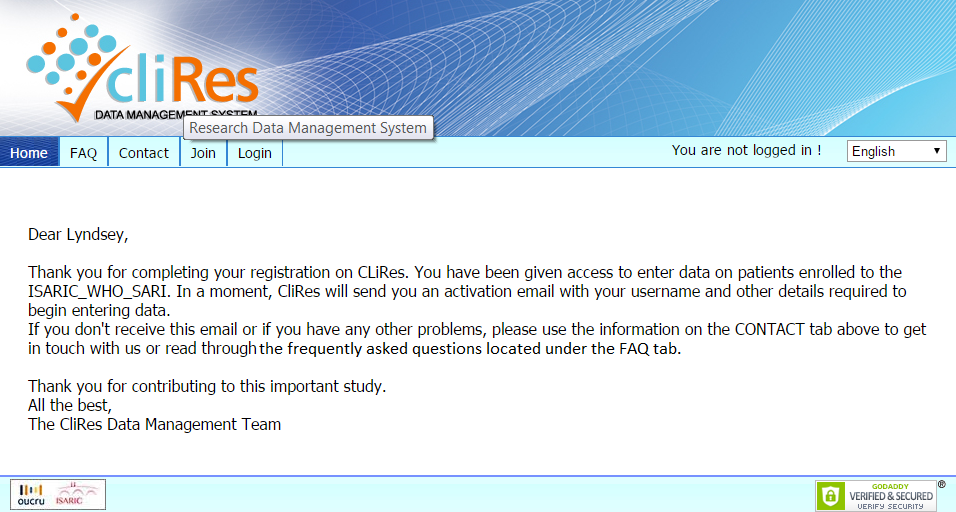
You will then receive an email with information on your username and
password. It will also include the
terms and conditions of database use.
Upon acceptance of these terms, your access will be activated.
<![if !supportLists]>
1.3
<![endif]>
Site numbers &
network numbers
<![if !supportLists]>
·
<![endif]>
A site number will be allocated following registration of a new site.
<![if !supportLists]>
·
<![endif]>
Confirmation of these numbers will be sent via email to the
first person who registers a new site and
becomes the Site Owner.
<![if !supportLists]>
·
<![endif]>
The Site Owner will be assigned administrative rights and will need to
approve additional CliRes users for their site.
<![if !supportLists]>
·
<![endif]>
Registration of a new site will include the selection of the primary research
network to which the site is affiliated (if any).
Each network will have a code to help identify participants from this
network within the dataset. It is
important to note the network code
will not be visible on the CliRes database and this number does not need
to be documented on any of the patient CRFs.
This number will be included in the data extractions only.
<![if !supportLists]>
1.4
<![endif]>Registering as a new user for an existing
site which already has a site number
All individuals must have
a unique username. If your site has already been
registered by the Site Owner, you can register to be a user for that site. When you do, an email will be sent to
the Site Owner with a link to approve your access.
To register, the user should:
<![if !supportLists]>
·
<![endif]>
Enter the following web address
www.CliResdms.org
<![if !supportLists]>
·
<![endif]>
Select ‘Join’ from the top menu.

<![if !supportLists]>
·
<![endif]>
Select
<![if !supportLists]>
·
<![endif]>
Complete all fields including the selection of the existing site.
<![if !supportLists]>
·
<![endif]>
Select ‘Next’ (at the bottom of the page).
The following message will appear:
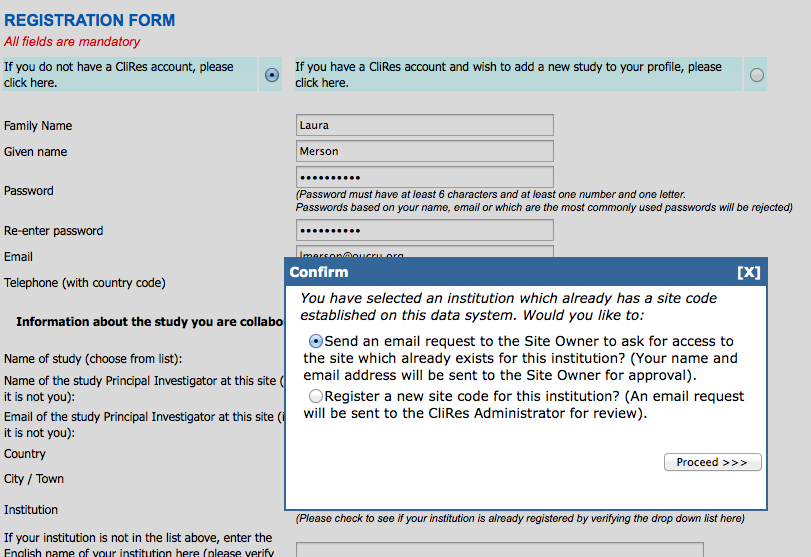
You should choose the first (top) option.
An email will be sent to the Site Owner for approval. You will be notified by email if your
request is approved. If it is
approved, the notification email will include information on your username and
password. It will also include the terms
and conditions of database use.
Upon acceptance of these terms, your access will be activated.
<![if !supportLists]>
1.5
<![endif]>Registering as a new user for an existing
site, but you would like to have a different site number for this same site
Our preference is to have one site number per site, but we understand that
sometimes different wards or departments within a single site may wish to
separate their datasets. If this is
true, the first person who registers for this new site number will become the
Site Owner of the new site. All
other users will need to register for access to the site dataset as above (see
1.4).
To register, the person who will be the Site Owner should:
<![if !supportLists]>
·
<![endif]>
Enter the following web address
www.CliResdms.org
<![if !supportLists]>
·
<![endif]>
Select ‘Join’ from the top menu.
<![if !supportLists]>
·
<![endif]>
Select
<![if !supportLists]>
·
<![endif]>
Complete all fields including the selection of the existing site.
<![if !supportLists]>
·
<![endif]>
Select ‘Next’ (at the bottom of the page).
<![if !supportLists]>
·
<![endif]>
A webpage with the following message will be displayed:
You should choose the
second (bottom) option. An email
will be sent to the Database Administrator for approval. You will be notified by email if your
request is approved. If it is
approved, the notification email will include information on your new site
number, username and password. It will
also include the terms and conditions of database use.
Upon acceptance of these terms, your
access will be activated.
<![if !supportLists]>
1.6
<![endif]>Adding sites or datasets/studies to your
permission
If you already have a username and password which has been approved for a
certain site, you can add permission to access an additional site or an
additional dataset/study (Ebola, Viral haemorrhagic fever, etc) by updating your
permissions. To do so:
<![if !supportLists]>
·
<![endif]>
Enter the following web address
www.CliResdms.org
<![if !supportLists]>
·
<![endif]>
Select ‘Join’ from the top menu.
<![if !supportLists]>
·
<![endif]>
Select
<![if !supportLists]>
·
<![endif]>
Complete all fields including the selection of the new site or new dataset.
<![if !supportLists]>
·
<![endif]>
Select ‘Next’ (at the bottom of the page).
Your request will be sent to the Site Owner for approval. If the Site Owner clicks the email
link to approve your request, you will receive notification of approval via
email. The notification will require
you to accept the terms and conditions of access for the database. Upon acceptance, your access will be
updated to include the new site or dataset/study.
<![if !supportLists]>
1.7
<![endif]>CliRes database training and testing
<![if !supportLists]>
·
<![endif]>
We suggest that someone familiar with this user guide and the database
provide training for other team members to ensure understanding and consistency
of use.
<![if !supportLists]>
·
<![endif]>
All sites can enter test patients to familiarise themselves with the database
design and CRF layout. To do so,
enrol a patient with site code 000 (e.g. participant number 000-0123). This is a universal test code that
can accommodate fake data without risk to the true dataset. It is a good idea for all staff to
practice using the database before hand using this site code to generate
participant numbers.
<![if !supportLists]>
1.8
<![endif]>Laboratory Reference Ranges
<![if !supportLists]>
·
<![endif]>
All sites
must provide a copy of their laboratory
haematology and biochemistry reference ranges to the Data Manager in
order to ensure database validation checks are set accordingly. Please email a copy to
data@iddo.org along with your site
number.
<![if !supportLists]>
2
<![endif]>SELECTING MODULES / TIERS
<![if !supportLists]>
2.1
<![endif]>SPRINT-SARI CRF
<![if !supportLists]>
·
<![endif]>
The SPRINT SARI CRF is comprised of four main CRFs – the INCLUSION CRITERIA
CRF, the RAPID CRF, the CORE CRF and the DAILY CRF. There are also SUPPLEMENTAL CRFs,
which include optional modules and extra space on the paper forms for
information that does not fit on the printed sheets.
<![if !supportLists]>
·
<![endif]>
The sites will decide which combinations of CRFs to complete based on the
options below.
|
Tier
|
CRFs to be completed for
each eligible patient
|
|
Tier 0
|
INCLUSION CRF + RAPID CRF
|
|
Tier 1
|
INCLUSION CRF + CORE CRF + DAILY CRF*
*DAILY CRF should be completed on the first day of hospital admission AND the first day of ICU admission (if applicable)
(note: these could be the same day)
|
|
Tier 2
|
INCLUSION CRF + CORE CRF + DAILY CRF**
**DAILY CRF should be completed on
the first and second days of hospital
admission AND the first and second days of ICU admission (if applicable)
(note: these could overlap)
|
|
Tier 3
|
SAME AS TIER 2 + EPIDEMIOLOGY CRF
|
Before you begin data
entry, you must select the Tier that your site will use. This will automatically program your
site database with the corresponding CRFs.
All persons who have been given permission to access a site will be able
to change the selected Tier. To
select your Tier:
<![if !supportLists]>
a)
<![endif]>
Login to CliRes.
<![if !supportLists]>
b)
<![endif]>
Select MODULE SELECTION from the
database menu (on the left hand side).
<![if !supportLists]>
c)
<![endif]>
Select the applicable tick box next to the chosen Tier or the chosen CRFs.
<![if !supportLists]>
d)
<![endif]>
Click on save settings (at bottom of page).
Note that the Tier or
modules chosen for your site can be changed at anytime. Changing the Tier/modules will result
in the appearance (or disappearance) of the corresponding CRFs on your site’s
dataset. This function only hides
the CRFs, it does not delete or remove any information which has been entered
onto them.
E.g. for SPRINT SARI: If a
site moves from Tier 2 to Tier 0 during the study, the CORE and DAILY CRFs will
no longer appear on the data entry or data view options – but they are still
saved in the database.
E.g. for other datasets:
If you include a module at the start of data collection, then later de-select it
from the list on MODULE SELECTION you will no longer see the CRF listed in the
participant CRF data entry or data view pages – but they are still saved on the
database.
All data that has been
entered for a site, regardless of the selected Tier/module, can be extracted by
the Site Owner via the DATA EXTRACTION function (see section 5 below). If you wish to view individual
patient CRFs within the data entry or data view functions, you must have
selected the Tier/module which corresponds to those CRFs being active and
visible.
<![if !supportLists]>
3
<![endif]>
ENROLLING PARTICIPANTS
<![if !supportLists]>
3.1
<![endif]>Creating new subjects on the database
A number for each participant (PIN) must be enrolled to the database before
data can be entered for that participant. To do this:
<![if !supportLists]>
a)
<![endif]>
Login to CliRes.
<![if !supportLists]>
b)
<![endif]>
Select ENROLL NEW CODES from the database menu (on the left hand side).
<![if !supportLists]>
c)
<![endif]>
Enter the PIN XXX-YYYY
<![if !supportLists]>
d)
<![endif]>
Click on enrol.
<![if !supportLists]>
e)
<![endif]>
The new PIN should then appear at the top of the patient enrolment list.
<![if !supportLists]>
3.2
<![endif]>Patient Identification Number (PIN)
<![if !supportLists]>
·
<![endif]>
Participant identification numbers consist of a 3-digit site code and a
unique participant number. They will be in the format of XXX-YYYY where XXX is
the site code and YYYY is the unique sequential number assigned to that
individual.
<![if !supportLists]>
·
<![endif]>
You were assigned a site code for your site when you registered for your
username to access the database. The site codes that you have access to will be
listed on the ENROLL NEW CODES page.
<![if !supportLists]>
·
<![endif]>
Unique participant numbers should be assigned by the site and may include
letters and/or numbers in any combination with up to 9 characters
(XXX-YYYYYYYYY) E.g. 000-PLK356. We
suggest that your site defines the number of characters to be used in PINs and
keeps this consistent for all PINs.
This will avoid confusion of assigning two patients as 020-001 and 020-0001 (for
example). Note that the paper CRFs
only provide space for a 4-digit unique participant number; therefore if your
site will use paper forms, we recommend a XXX-YYYY format.
<![if !supportLists]>
·
<![endif]>
Should a site wish to recruit patients from different wards, or where it is
otherwise too difficult to implement sequential number order. It is acceptable to assign patient
numbers in blocks and include alphabetical characters e.g. Ward X will assign
numbers from 0001 or A0001 and Ward Y 0002 or B0002 onwards.